
Tipps & Tricks
There is nothing as important as insider knowledge. In this section we will add several tips & tricks that are good to know when in Iceland.
Before, during and after
Our main webpage www.campericeland.is has been rewarded for including most informations you will need for your trip to Iceland. It even includes a customer section where you can read about what to bring to Iceland (clothes etc.). We highly recommend reading our webpage before coming to Iceland.
Before leaving the rental station
Never leave the station incomplete
Make sure you have all items that belong to the vehicle. Tools to change a tire, electrical cable for the camp ground, adapter for the cable, camping kit, bed sheets, pillows etc. Also make sure you have looked at all extras because we have had many customers that skipped extras and on the first camp ground the go: “Would have been nice to have camping chairs and a table”.
Does your internet or phone work
For any case you will probably need your phone to work. Sometimes it happens that foreign providers do not work in Iceland. Then people buy SIM cards from Iceland and notice their phone is locked (Sim card does not work). We rent emergency phones that can be used for phone calls only. We also rent WiFi units that you can take with you and connect your devices wit WiFi to it.
Last but not least
Are you sure how the vehicle works and do you feel happy. Our experience is that if the customer is not happy when he leaves, he will not be happy when he comes back. Please be part of the team, be part of us and talk to us if you need anything. Remember that if you are not part of the solution you have become part of the problem.
Before driving or leaving the Camp Ground
How many times have you seen a Motor Home with an open window on the road. Or driven one yourself and in the next corner the fridge opens and the eggs fall out?
There is but one way!Use a checklist:
Outside Tasks
- Check tire pressure of vehicle
- Check oil and fluid levels in truck
- Roll up awning if installed
- Fold up & stow the patio rug
- Stow chairs, grill, etc.
- Dump toilet tank
- Dump gray holding tank
- Unplug trailer & stow power cord, adapters
- Turn off propane (run fridge on 12v while driving)
- Stow leveling/stabilizing gear if you rented it
- Remove & stow wheel chocks if you installed something
- Walk around site to check for forgotten items
- Pick up and stow the door mat
- Lock outside compartments
- Walk around site one last time
Inside tasks
- Lower TV antenna if installed
- Stow appliances
- Stow pictures and nick knacks
- Close roof vents
- Close all windows
- Secure cabinets, drawers, fridge
- Furnace turned off
- Water heater turned off
- Water pump turned off
Credit card PIN & Gas Stations
Unfortunately most gas stations only allow a 4 digit pin. If you can change your pin before going to Iceland it would be great. If you cannot change the pin you could buy prepaid fuel cards at the gas station. The other solution will be standing in front of a pump with an empty tank and solving it then by finding people that have a card, give them cash or something like that.
When filling up the vehicle make sure you are using the right fuel. The color on the different fuel types can be misleading. F.e green is often gasoline, black is diesel (not like in the US). The most important thing is to know the difference of Diesel and Gasoline. The pump is well explained and there should be the letters DISEL or BENSIN. Our Bensin (Gasoline) is 95oct. We recommend using a serviced station for the first time and if you are not sure, please ask a service attendant.
Please make sure to use the right key to open the lid. Another common (once a year) mistake is to fill the water tank up with diesel. Please try not to. The water will smell funny and it could lead in replacing the complete water system at your cost.
Drive Safe
Iceland has a unique road system that cannot be compared to any other country. F.e. driving off a paved road on to an unpaved / gravel road can be hazardous if the driver is not aware of the change and slows down. The constant weather changes also effect the road situation.
If you not rented a 4×4 vehicle, you are not allowed to drive on mountain roads (F-Roads, all roads that beginn with the letter F). According to Icelandic law every passenger must wear a seatbelt and children must use appropriate safety equipment. Headlights must be turned on while driving. Driving off-road is illegal!
In our Instruction section you can watch movies to prepare for Iceland, it’s roads and the vehicle category you have rented.
Gravel Roads
Loose gravel
All mountain roads and roads in the interior of Iceland have a surface of loose gravel. The same applies to large sections of the national highway, which also has long stretches of asphalt. The surface on the gravel roads is often loose, especially along the sides of the roads, so one should drive carefully and slow down whenever approaching an oncoming car. The mountain roads are also often very narrow, and are not made for speeding.
The same goes for many bridges, which are only wide enough for one car at a time. In addition to their not having an asphalt surface, the mountain roads are often very winding. Journeys therefore often take longer than might be expected. For information on road conditions: Tel: 354-563-1500, answering service 24 hours, Tel: 800-6316 (In English 1/6-31/8).
Highland Driving
Winter:
During the winter time the Icelandic highlands are impassable/closed for anyone not in a modified vehicle (super jeep). Timing of these closures depend entirely on weather and conditions each year. Every year is different – winter arrives at different times so a closure date is not set in stone but further information on this can be found here.
To visit the Icelandic highlands in wintertime you will need a modified vehicle along with a driver, skilled and experienced with the conditions.
Summer:
Highland driving is very popular during the summertime. It requires a whole different set of skills than normal driving however. Conditions can change even more rapidly than on lowlands and roads often require you to cross unbridged rivers. Roads can be rough and you may not reach speeds much over 40 km/h so make sure you plan for enough time. Because of this, gathering information about the area you are travelling to and leaving a detailed Travel Plan is extremely important.
- Start by checking if roads leading to the area have opened or not. What are the road conditions?
- Make sure to check the weather forecast for the area while keeping in mind that it can change rapidly so prepare for all kinds of weather.
- Information Centers in the area, rangers and wardens are good sources for detailed information.
- Make sure that you have the proper knowledge and experience for driving in the highlands.
- A small vehicle has no business into the highlands – a 4×4 (4WD) with good ground clearance is required at all times!
River Crossing in the highlands:
Driving in the highlands will inevitably lead you to a river crossing. Keep the following things in mind:
- There’s no insurance in the world that covers any damage that can be lead to crossing rivers or any body of water. The risk is yours and damages can cost thousands of euros/dollars.
- Do not cross a river unless you are a 100% sure of being able to get to the other side – if you’re unsure, wait for the next car to come by and decide if you can go or not.
- The current and depth of the rivers changes according to glacial melt and precipitation. Keep in mind that rivers can become impassable after heavy rainfall.
- Be sure of the route you are going to take before entering the water.
- Put your car in a low-gear and cross the river slowly (5 km/h) and steady – do not switch gears while in the water!
- Always try to go down stream as going against the current will increase the risk of water going into your engine.
- Even the smallest of rivers have lead to some costly damages simply because of the drivers choosing the wrong routes or going too fast.
- Do NOT enter the river where it seems calm – this is a sign of depth and is not the ideal spot to cross.
- Do not be fooled by big modified vehicles. They can cross the rivers at higher speeds because they are equipped with a snorkel – allowing the oxygen intake of the engine to be at a higher point than on normal vehicles.
Look for signs like this one and the measuring poles in the rivers. The colors indicate the depth of the rivers but keep in mind that not all rivers have this helpful tool:
How does an Inverter work
How to cross a rive (4x4 only)
Important note: Camper Iceland cannot be held responsible for any actions a driver takes. The driver holds the responsibility for all actions. The following article will help you to gain a better understanding of water crossing.
Short version
Our highland routes still have unbridged rivers that you will have to cross. If you do not want to cross a river we recommend driving around Iceland where most of our natures pearls await you. For the ones that do want to explore the rough highlands here are a few tips from the old Icelanders:
When reaching the river the first thing that you need to do is listen to your stomach. If it tells you there is something wrong you should listen.
Most customers wait until someone else crosses to see how it goes. Clever, those Camper Iceland customers, right? Another approach is to wade into the river and check it yourself before driving into it. Please be careful.
“Hafa vaðið fyrir neðan sig”. When Icelanders waded through the rivers they always checked that the best place to wade would be beneath them (further down the stream). In case the horse would flood/swim it could get a grip. Going into the river beneath the place to wade would result in a dangerous adventure. The same applies for vehicles.
Drive as slow as you can. Nothing will be better when you go fast. The water can enter the air intake or flood the engine and or transmission. the water could effect your vision and will most likely fill up important electrical components. F.e. the horn goes dead, the ventilation can stall, the engine can misfire or turn off. The old Icelanders used to back up over the river to avoid air getting into the air intake.
If equipped with a LOW gear it would be wise to use it, shift into first gear and cross the river like a true viking. In respect of nature and all beings.
Crossing a river is not really difficult if done correctly and with wisdom. However no Icelandic insurance company will insure water damages. Damages caused by river crossing / water damages are not covered.
Shortest version
Only cross water that is not deeper then to your knee. Find out by wading it first. Never drive faster then walking speed. Splashing water is the most common reason for engine damages.
Long version
In cooperation with Offroaders.com
As an opening statement it should be said that a deep water crossing should not be attempted by the inexperienced. Remember that you are driving a rental car and there are more renters on their way to Iceland. A damaged vehicle could ruin someone else’s vacation. If you want to go for a deep water crossing consider buying your own vehicle.
A water crossing can be fatal to an engine and even worse, to occupants of the vehicle in the worst case scenario. Never underestimate the force of flowing water. Water weighs about 62.4 pounds per cubic foot and typically flows downstream at approximately 6 to 12 miles an hour. For each foot the water against a vehicle, 500 pounds of lateral force are applied to the vehicle. As a vehicle enters water, 1500 pounds of buoyant force are produced for each foot that the vehicle is submerged. This basically means that a vehicle weighs 1,500 pounds less for each foot of water. When the buoyant force exceeds the weight of the vehicle, it begins to float and is now at the mercy of the water as the flowing force of the water is exerted on the vehicle, pushing it downstream. For typical cars, this translates into a floating car in just two feet of water. To put it into a 4×4 perspective, a 4×4 vehicle is typically lifted to some degree. This puts the buoyant part of the vehicle, mainly the body although tires are quite buoyant, higher than cars, but in many cases not by much. The key point is that like a boat, the water displaced creates the buoyancy and vehicles actually float until water seeps into them. But by the time water seeps in, it may be too late.
That being said, a water crossings in a 4×4 can sometimes be some of the most exciting and challenging situations you do when off-road. Water crossings can also become some of the most expensive.
A 4×4 is not an amphibious vehicle, nor is it waterproof. Even those 4×4 vehicles that have been modified to tread water have their limitations when crossing through deeper waters. The depth to which a vehicle can be submerged depends greatly on the vehicle itself. Those factors not only apply to the vehicle but the age of the vehicle as seals deteriorate. As a rule of thumb, the depth limit of a vehicle is about the top of the tires and even that is probably too deep.
Unfamiliar Waters
Prior to a crossing unfamiliar water is to walk it. Yes, get wet. If you cannot walk it you cannot cross it with your vehicle. If the water is flowing too quickly or is too deep to safely walk the crossing, then it cannot be driven across without serious risk.
Breathers
Axles, manual transmissions and transfer-cases typically have breathers. Breathers are designed to allow air pressure to equalize between the atmosphere and the inside of the mechanical component. During use, axles, transmissions and transfer-cases heat up. When a hot axle or gear box hits cold water it rapidly cools. This causes the air pressure inside the axle tube, differential housing, and gearboxes to reduce as the air molecules to contract. This in turn causes air to be drawn in via the diff breathers. If your breathers are below the water level or getting splashed, water will also be sucked into the breathers. Extending your low lying breathers, especially differential breathers, up higher into the chassis area using flexible tubing will allow a cooling component to draw dry air rather than water during a water crossing. This is a necessary modification for 4×4’s that frequently encounter water crossings. Of course even with breather extensions, there is no guarantee that water will not enter your gearbox and differentials. Rapid temperature reduction, worn seals, loose bolts, all can be the cause of water getting into places it shouldn’t be. As a preventative measure and the very least giving the axles, differentials, gearbox and transfer-case time to cool down means there won’t be as sudden a pressure drop in these mechanical components causing water to be sucked in.
Air Intake
Engines breath air. As air is pulled into the engine, it is compressed by the pistons. Water does not compress. If water gets sucked into your air intake on the engine, it can result in serious damage. The engine attempts to compress what is in the cylinder and if enough water enters a cylinder, even a smaller amount of water, the engine can instantly stop as it tries to compress what can not be compressed, which results in something called commonly called “hydro-locking”. This usually results in bent or broken pistons, valves and crankshaft. An expensive end to your day.
So where is your air intake? Is it behind the grill? Behind the headlight? On top of the engine or high atop the vehicle relocated by a snorkel? The location of your air intake is critical to how well a vehicle can handle a crossing as far as the air intake goes. Many vehicles have their air intakes in optimal locations to allow cold air into the engine such as directly behind the headlight, or through the fender wall. Unfortunately these locations are great places for directing water into the engine. Examine your air intake to see where it is pulling air from. If it is right out there where a head of water will funnel right into the air intake during a water crossing.
If you own the vehicle: NEVER attempt a water crossing where the water depth is above the height of your air intake. Rental Car: NEVER attemt a water crossing if the water level is beyond your knees. As an obvious word of caution, do not consider the location of the air intake to be the depth that you can submerge your vehicle!
The Engine Bay
Aside from submerging your vehicle to the point where it floats, your engine bay is the primary concern when driving through water. Almost as important as the air intake is your ignition system. In many cases a wet ignition system will cause the engine to stall. Not a good thing in the middle of a river. Water on spark plug wires, an old seal on the distributor cap (or no seal at all), a wet coil or wet ignition module can all cause an engine to stall. Typically though water in the ignition system usually results in just a stalled engine and not actual engine damage. But when it does occur, it’s usually in a place where you cannot easily dry off your ignition system components such as in the middle of a crossing. So protecting the important components from water can be the difference between getting across and going into recover mode.
When you move through water, the front of the vehicle creates a bow wave. This raises the water level at the front of the vehicle, the primary point of water entry into the engine bay. For that reason, go slow, don’t plow through the water as fast you can to get to the other side. As a preventative measure, some people place a tarp across the front of the vehicle to minimize water entering the engine bay so long as you keep moving forward. The result of the tarp method is less water for the radiator fan to spray over the ignition system and less of a chance for the fan to warp and slice into the radiator. It also helps to reduce the chances of water entering the air intake. To minimize stalling from a wet ignition, inspect seals, wires, and all other ignition system parts and replace worn out parts and seals. It’s also a good idea to spray all ignition system parts with water repellent before they get wet. Diesel engines usually do better with water crossings since they do not have the ignition system to worry about.
The Radiator Fan
Inspect your radiator fan. Take note of type of radiator fan you have. Most 4×4’s have a viscous coupling type fan, also called a clutch style fan. These fans do not spin at full speed when the engine is cool and can be a benefit when encountering a water crossing. You may also find that you have a fixed type fan that always spins at the speed of the engine. To check your fan turn off the engine and try spinning the fan. If the fan turn easily with the engine off and there appears to be a clutch mechanism at the center of the fan this is most likely a clutch type fan you will probably can get away without taking off the fan belt. If the fan doesn’t turn easy or it is definitely the fixed type fan, then you should consider removing the fan belt before entering a water crossing. The reason is when a fan encounters water, it acts much the same way as a propeller and a light-weight radiator fan will flex opposite the direction that it blows air, which is towards the radiator. With most engines having little clearance between the radiator and radiator fan, this means you may see contact as the fan bends, possibly slicing into and damaging your radiator.
Walking the Crossing
When you encounter an unfamiliar water crossing and there is no way to easily examine the depth, sometimes the best way to scout out your crossing is to get wet and walk it. Walking a water crossing is the best way to find a good track for your wheels to follow and locate any hidden potholes and large rocks as well as checking the depth of the water. Since water has a way of distorting the view of the bottom and making it hard to estimate the depth it’s a good idea to walk in the line that you intend to take, making note of the wheel tracks and objects between the wheel tracks. Some people place markers in the water to mark hidden objects or drop-offs or deeper holes. A marker could be a tall stick or even a tethered balloon.
Techniques for Driving through the Water
When entering the water typically using low range second gear at about 1500-2000 rpm creates just about the right bow wave. This bow wave of water helps to maintain momentum and push water ahead of your engine bay. Get the speed just right is tricky. Do not attempt to drive too fast through the water. The idea is not to get across as fast as you can. Too fast will send water over your hood and possibly into your intake. Too slow may flood the engine bay. Hopefully you follow your line get to the other side with no issues. If you have to stop, slow or reverse, avoid using the clutch as this may allow water and debris to get between the friction plate and the flywheel. If you start to loose traction, its important not to over-rev the engine. Back-off the accelerator and move the front wheels side to side a little in the hope that the wheels may regain traction.
If you stall the engine, put the vehicle in neutral without using the clutch and attempt to restart. If your lucky and you didn’t flood the intake or drench your electrical components the engine will fire up. Its normally best to use 1st gear low range and with a minimum of clutch usage, try to get moving again. If you find yourself stalled in the middle of a crossing and you can not re-fire the engine, depending on the water depth, its advisable to climb out of your window rather than open the door and flood your interior including electrical components, seats, gear and carpets.
Maintenance after Water-crossings
After encountering a water crossing you want to be sure to inspect specific things that could be affected by the water. Any time you encounter a water crossing that is axle depth or deeper, check the differential oil for water contamination. Even if you have an extended differential breathers, this is not a guarantee that water has not entered the differential. If you do not have differential breathers this should mean a mandatory inspection. Even though the best time to check the differentials for water is right after the crossing, most of the time, people will not check it right there and will continue wheeling the rest of the day. However checking the differential fluid is relatively easy to do. Since water is heavier than your gear oil oil, it will collect at the lowest point in the differential, at the drain plug. To properly inspect it after a crossing allowing time for your axles vehicle to cool a bit, then loosen the drain bolt and run a small amount of the gear oil into a glass or cup. You’ll see water if it’s present. Also a milky or chocolate milk colored oil indicates water is present. If you’re unlucky enough to have water present in your gear oil, the differential oil should be drained and replaced. Driving your vehicle for any distance with water mixed with the gear oil can damage your ring and pinion. If you had taken on water in the differential and have to drive out, allow the axle to cool for a while and attempt to drain as much water as possibly without draining any larger quantity of gear oil. Collect this oil and water mixture in a container and save it until you get home, then dispose of it properly. Never dispose of oil into the environment.
Aside from the axle differentials your gearbox, transfer case and engine oil can all become contaminated by water. These however usually only take on water when a vehicle is stationary in deeper water. Also check other electrical items.
Water crossing should be taken seriously. Water has the potential to do expensive damage to your vehicle’s engine and drive train. But with proper preparation and post inspection and maintenance, the challenge of a water crossing can be as enjoyable as any other off-road challenge.
How to calculate fuel cost
Most of our vehicles are equipped with an onboard computer showing the actual or average fuel consumptions. However if you want to calculate the fuel consumption “the old way” please follow these instructions:
Fill up the gasoline / diesel tank. Write down the odometer status (or use the TRIP function if available)
The nest time you need fuel, fill the gasoline / diesel tank write down how many liters you had to buy.
Write down the odometer status or check the TRIP function how many KM you drove
ATT: Check if the odometer is in Miles or Kilometers (The odometer in us trucks can be in miles, the speedometer would be both but the odometer miles) If the odometer is in miles multiply the trip with 1.6 to convert to Km.
(Litres consumed / KM travelled) x 100 = litres/100 km
German edition:
Gehe zur Tankstelle und fülle den Tank.
Schreibe den Kilometerstand auf. Bevor du von der Zapfsäule wegfährst, schreibe den aktuellen Kilometerstand auf. Wir nennen diesen Kilometerstand Fahre normal. Um einen möglichst genauen Wert zu erhalten, fahre, bis der Tank weniger als halb voll ist. Je länger du fahren kannst, ohne zu tanken, desto genauer wird die Kalkulation.
Fülle den Tank wieder auf. Achte diesmal darauf, wie viele Liter in den Tank passen. Dies wird an der Zapfsäule angezeigt. Wir nennen dies Liter.
Schreibe auch den Kilometerstand wieder an. Diese Zahl nennen wir Kilometerstand B.
Berechne. Die Formel zur Bestimmung des Verbrauchs pro 100 KM lautet:
Verbrauch pro KM = Liter x 100 ÷ (Kilometerstand B – Kilometerstand A)
Subtrahiere Kilometerstand A von Kilometerstand B. So erhältst du die Anzahl gefahrener Kilometer seit dem letzten Tanken.
Multipliziere die Liter mit 100 und teile sie durch die gefahrenen Kilometern. So erhältst du den Verbrauch pro 100km.
ACHTUNG: Unsere US Fahrzeuge haben oft Meilen anstelle von Kilometern in der Anzeige. Das würde man anhand des Tachometers erkennen. Die Meilen währen in Grossschrift und die Km in Kleinschrift. Um nicht ein falsches Ergebnis zu erhalten solltest du die gefahrenen Milen mit 1.6 multiplizieren um die Gefahrenen Kilometer zu erhalten.
Methode 1 von 3: Beispiel
Fahrt A: Getankt 30 l bei 3.117 km
Fahrt B: Getankt 45 l bei 3.579 km
Fahrt C: Getankt 40 l bei 4.017 km
Methode 2 von 3: Lösung der Berechnung des Kilometerstands
Fahrt A: Basis, zählt nicht.
Fahrt B: 45 l x 100 ÷ (3.579 km – 3.117 km) = 9,74l / 100km
Fahrt C: 40l x 100 ÷ (4,017 km – 3,579 km) = 9,13l / 100km
Methode 3 von 3: Zusätzliche Genauigkeit
Prüfe deinen Kilometerzähler. Nicht bei allen Autos misst der Kilometerzähler richtig. Dies führt nicht zur zu einer unrichtigen Angabe der gefahrenen Kilometer, sondern verändert auch die Angaben über den Verbrauch. Vor allem wenn das Fahrzeug grössere Reifen hat als mit dem Tachometer geeicht wurde wird das Fahrzeug weiter rollen als die Anzeige angibt. Um Fehler auszuschliessen lässt sich auch ein GPS Gerät brauchen.
Wenn dein Kilometerzähler mehr anzeigt als die gefahrene Distanz, ist Verbrauch pro km höher als du berechnet hast. Du bist in Wirklichkeit weniger weit gefahren als du anhand der Angabe des Kilometerzählers berechnet hast. Wenn dein Kilometerzähler andererseits weniger anzeigt als die gefahrene Distanz, ist der Verbrauch auch niedriger.
Berechne die Abweichung. Wir bezeichnen die wirkliche Distanz als A, und die auf dem Kilometerzähler angezeigten Kilometer als T. Wir nennen dies Abweichung O. Die Formel zur Bestimmung der Abweichung ist:
O=A÷T.
Wenn du zum Beispiel 5 Kilometer fährst und dein Kilometerzähler sagt, du bist 4,5 gefahren, lautet deine Formel:
O = 5÷4.5; O=1.11. Um die tatsächlichen Kilometer für die Verbrauch /100km Formel zu erhalten, zieht man Kilometerstand A von Kilometerstand B wie normal ab, dann multipliziert man das Ergebnis mit 1.11, bevor man die MPG Berechnung fertigstellt.
Wenn Kilometerstand B – Kilometerstand A = 100, ist, multipliziere dies mit (1.11). In diesem Beispiel bist du in Wirklichkeit 111 Kilometer gefahren.
Wenn dein Kilometerzáhler angibt, dass du 5,5 km gefahren bist, sieht die Formel so aus:
O=5÷5.5; O=.91. Wiederum musst du Kilometerstand A minus Kilometerstand B mal O multiplizieren.
Wenn Kilometerstand A – Kilometerstand B = 100, multipliziert mit O (0.91). In diesem Beispiel bist du 91km gefahren.
Tipps
Du kannst anhand des Verbrauchsexperiments den Verbrauch verbessern. Wenn du z.B. normalerweise 90km/h fährst, versuche nach dem Experiment, 80 zu fahren, du wirst sehen, wie der Verbrauch sinkt.
Um den Treibstoff möglichst effizient zu nutzen, fahre zwischen 80 und 90 km/h, wo dies erlaubt ist. Du bezahlst nicht nur weniger Spritkosten, sondern du verlängerst auch die Lebensdauer des Autos und seiner Teile. Auf den Schotterpisten solltest du langsamer fahren, vor allem vor Brücken.
Berechne den Verbrauch öfter als einmal, um eine genauere Messung zu erzielen. Wenn du mehr auf der Route 1 gefahren bist als normal, wird dein Verbrauch etwas niedriger sein. Wenn du mehr in der Stadt gefahren bist (Stopp and Go), ist der Verbrauch höher.
Die große Mehrheit der Autos ist mit einem Verbrauchsmesser ausgestattet – dieser berechnet den Verbrauch und kann zurückgesetzt werden. Dieses Messgerät ist zusätzlich zum normalen Kilometerzähler vorhanden, der die Anzahl der vom Fahrzeug gefahrenen Kilometer berechnet. Man kann es verwenden, um den Verbrauch zu berechnen. Verwende dazu oben stehende Formel. Auf den Suchmaschinen (z.B. Google) lassen sich auch Umrechner finden, falls der Computer miles per gallon anzeigt.
Zur Bestimmung, wie eine Änderung der Benzinpreise dein Budget beeinflusst, nimm die Anzahl Kilometer, die du in einer Woche (oder einem Monat, einem Jahr) fährst und multipliziere sie mit deinem Verbrauch / 100. Dann multipliziere dieses Ergebnis mit dem Spritpreis pro Liter. Durch Einsetzen verschiedener Preise siehst du wie viel mehr – oder weniger – du pro Woche (oder Monat, oder Jahr) zahlst.
Warnungen
Der Verbrauch variiert mit dem Fahrstil, je weniger du bremst und beschleunigst, desto geringer ist dein Verbrauch. Ausserorts-Fahrten verbrauchen weniger Sprit als Fahrten Stadt
Die Berechnung ist evtl. nicht genau. Wiederhole diese Schritte 2-3mal, um einen durchschnittlichen Verbrauch/100 km zu erhalten.
How to drive on Rocky ground, gravel and dust
Rocky ground
Ground clearance and suspension travel are two of the main criteria. High ground clearance allows the larger rocks to pass underneath without contacting vulnerable vehicle parts while good suspension travel allows the wheels to remain in contact with the ground.
Independent suspension usually provides a smoother ride in this type of terrain, but its design limits the wheel travel and ground clearance available. It goes without saying that rocky ground should be attempted at low speeds to minimize vehicle contact with the terrain.
While independent front suspension generally provides a smoother ride, it has a variable ground clearance to the front diff. As the front wheels hit a bump, the wheels rise up to absorb the bump. However the diff remains in the same relative position, effectively reducing the ground clearance under the diff. This can result in the diff hitting the ground, even though the obstacle under the diff was only half the height of the static ground clearance.
Live axle front suspension generally does not provide as smooth a ride as independent front suspension. However many live axle suspensions are now fitted with coils rather than leaf suspension, which significantly improves ride comfort. The advantage of live axles when off road is that when the wheels hit a bump, the whole axle rises with the wheels to absorb the bump. This maintains the same clearance from the diff to the ground.
While this is an advantage off-road, the fact the weight of the entire axle and diff is constantly moving with any bumps leads to a rougher ride, compared to independent front suspension.
When large drop-offs or ledges are encountered, they can be tackled at an angle to allow one wheel at a time to mount the obstacle. Bear in mind how this will affect the position of the vehicle as turning at an angle to a down hill ledge may result in the side rollover angle being reached.
Gravel roads
Traveling on long straight stretches of gravel roads can lull the driver into a false sense of security. Modern 4WD’s can make a relatively rough road seem smooth with their long travel suspension and sound deadened interiors. Speed creep can occur in these circumstances and when a bend is encountered the high centre of gravity in most 4WD’s may cause you to cross to the other side of the road or it can lead to a high risk of rollover.
If a sudden obstacle e.g. a sheep, appears it is very important not to swerve while braking. This goes for any road surface and not just gravel roads. However it is more critical on gravel roads as once a skid or slide starts, it is very difficult, if not impossible, to regain control. There are exceptions to this rule such as a truck heading straight for you at high speed. It is better to avoid a collision with the truck and take your chances hitting a roadside object than to have a head-on collision. However, neither of these options are particularly attractive and it is for better to be travelling at a safe speed for the conditions.
In part-time 4WD’s it is best to use 4WD on gravel roads to gain the better traction and road-handling of 4WD. Gravel roads provide enough slip not to cause any transmission windup problems. It is not necessary to use the centre diff lock of permanent 4WD’s on gravel roads.
Corrugated gravel roads can cause severe vibrations that can cause vehicle damage as nuts rattle off and vibrations damage electrical components. It is quite common for glass food containers to shatter even when stored in cabinets.
Increasing vehicle speed until it ‘planes’ over the corrugations con reduce vibration significantly, but the planing speed may be too high for the driving conditions. Depending on the corrugations, planing speed is around 60-80 km/h. Lowering tire pressures reduces vibration as the tire sidewalls act as shock absorbers. However this causes the tire to heat up and can lower tire life or even cause tire failure. It is sometimes better to sacrifice tire life and lower tire pressure to reduce the damage being caused to the vehicle, as well as the comfort of the vehicle’s occupants.
After driving long distances on poor quality roads, it is a good idea to check all nuts and bolts to see they haven’t vibrated loose. It is especially important to check all suspension components. The easiest way is to use an adjustable and when a loose nut or bolt is found, use the proper size wrench or socket to tighten it rather than risk rounding the head.
Dust Control
When driving on dusty roads, its a good idea to have all your windows closed and the ventilation control set to outside air with the fan on high. This pressurizes the vehicle interior slightly and helps reduce the amount of dust sucked into the vehicle. When another vehicle approaches, move the ventilation control to “recirculate” to stop dusty air coming in. Remember to move the ventilation back to outside air once you have passed through its dust trail or else the pressurization effect will be lost. In hot weather, vehicles without air-conditioning have to make a choice between minimizing dust intake or winding the windows down for the (cough) fresh air.
The biggest problem area for dust intake is from the rear tailgate. Check that the rubber seals are in good condition and that they seal when closed.
Source: Offroaders.com
Illegal off-road driving
Respect Icelandic Nature
It is illegal to drive off-road in Iceland!
Whilst traveling around the country, the highest respect for the Icelandic environment must be shown. Icelandic nature is extra fragile as the seasons change quite dramatically and changes in temperatures are common! It’s good to remember to take nothing except photographs and leave nothing behind except memories.
- It is illegal to drive off-road in Iceland. Only stay on roads and marked trails.
- High fines or imprisonment can be expected for offenses!
- Preparation – check out the road map and see where the roads and trails are.
- Get information about the appropriate routes at visitor centers and from rangers or staff in the area.
- Find out in advance when highland roads are likely to be open/closed, along with other related information, at visitor centers or here.
- By uprooting or driving on moss, damage is caused that can take nature decades to repair!
- If you come to a point where you can’t go any further by driving – turn around or continue a short way on foot while leaving a note in your vehicle where you state the time of your intended return.
Speed Limit
Speed limit
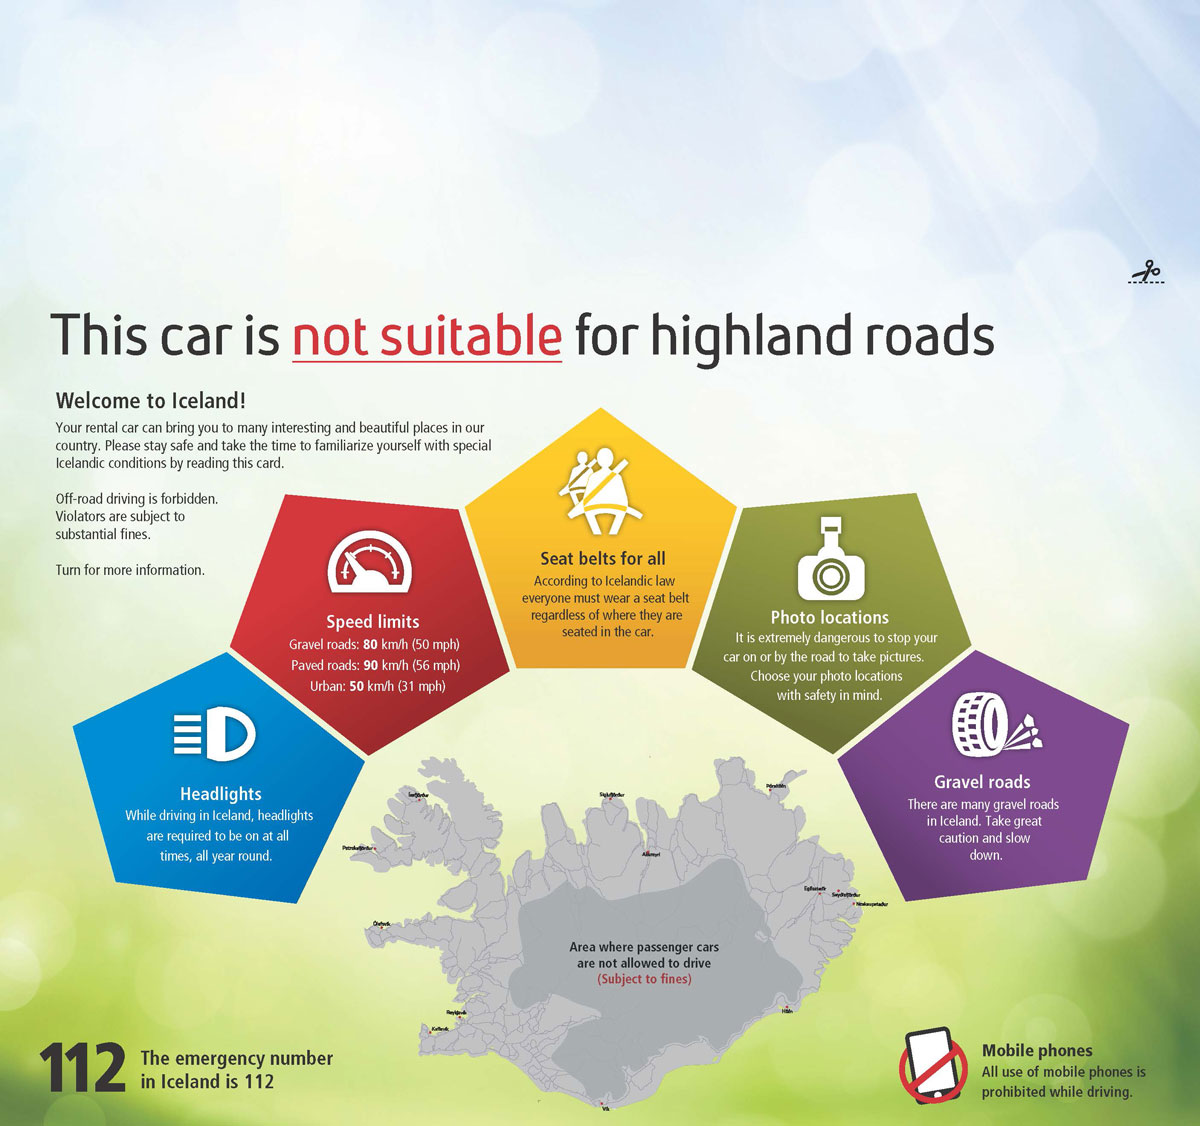
The general speed limit is 50 km/h in urban areas, 80 km/h on gravel roads in rural areas, and 90 km/h on asphalt roads. Please note: special warning signs indicate danger ahead, such as sharp bends, but there is generally not a separate sign to reduce speed. Please choose a safe speed according to conditions. Motorists are obliged by law to use headlights at all times day and night. In Iceland all driving off roads or marked tracks is forbidden. Passengers in the front and back seats of an automobile are required by law to use safety-belts. Icelandic law forbids any driving under the influence of alcohol.
Traffic Signs
A relatively large percentage of foreign tourists in Iceland travel around the country by car. Conditions in Iceland are in many ways unusual and often quite unlike those that foreign drivers are accustomed to. It is therefore very important to know how to drive in this country.
Check this PDF:
Also keep this in mind:


What to do in bad weather conditions
The weather in Iceland can change rapidly especially in the winter time. If you get into strong winds do the following:
- Bring the vehicle to a complete stop
- Look for a possibility to park the vehicle
- Park it facing the wind (do not let the wind get the side of the vehicle)
- Wait it out and check the *road and *weather condition
*The link can be found on the top right corner of this webpage
Winter Tires
Winter tires
Winter tires are allowed all year round and summer tires are allowed all year round. The requirements for tires do not apply to the usage of winter or summer tires, only to tread depth of tires and to studded tires. The following rules apply:
1 November – 14 April: Studded tires allowed (but not compulsory).
Note: Minimum thread depth is 3mm.
15 April – 31 October: Studded tires prohibited.
Note: Minimum thread depth is 1,6mm.
Must read weather information
Please read our PDF to learn how to read the weather information: